Friday, 8 April 2011

Establishing peer-to-peer connection or point-to-point network

People thinks that it is very easy to establish peer-to-peer connection. But things can be very much complicated. The setup of point-to-point network is shown in the Figure below:


Fig: Configuration of master PC which would act as a gateway for second PC connected to it.


Fig: configuration of second PC having master PC as gateway.

Now, In this scenario since both PC can communicate with each other but to access internet from second PC master PC acts as a gateway for the second PC.

People might think that it is very easy but sometimes it becomes complicated.

For example, When People try to esatblish connection between two PC's with different configurations they find it difficult to establish connection. They even changes the network cable thinking that cable is not good. Even they think that since both the PC's are of different configurations that's why connection is not establishing. They even go for external LAN card. But none of them thinks about the speed. The speed of network adapter. Now, modern days PC's support speed up to 1Gbps. By default, the speed of network adapter is in autonegotiate mode i.e; it will adjust speed automatically as per the envoronment (switch supporting speed up to 1Gbps). In point-to-point network to establish connectivity both the system must have same speed. For example: If one system is supporting the speed 10 Mbps/100 Mbps/1Gbps & other system is supporting the spped of 10/100 Mbps then set the system having maximum speed of 1Gbps to 100Mbps  & Try to establish connection. You will find that connection is established

Note: In pont-to-pont network to establish connection speed must be same doesn't matter what the configuration is.

Tuesday, 5 April 2011

To break password of GRUB in Linux

Step1 :> Boot from 1st CD or DVD

Step2:> Boot : Type linux rescue & press enter

Step3:> Do you want to enable the networking interface

                  yes/no  
Choose no for standalone system

Step4:> chroot /mnt/sysimage

                     continue
Press continue

Step5:> Type chroot /mnt/sysimage

Step6:>Type vi /etc/grub.conf

In grub.conf file remove the line

password --md5 ------------------------------

:wq

Step7:> exit

Step8:> reboot

To see the mountpoint of pendrive or external hardware

//To see the mount point:

tail -f /var/log/messages

or

tail /var/log/messages

To determine speed of ethernet card in linux

//To determine speed of ethernet card:

ethtool eth0

This command will tell whether the speed is 10mbps/100mbps & it would show the information about Lan card

To set speed 10mbps/100mbps of ethernet card in linux

//To set speed 10mbps:

ethtool -s eth0 speed 10 duplex full autonego off

mii-tool eth0

//To set speed 100mbps:

ethtool -s eth0 speed 100 duplex full autonego off

mii-tool eth0

//To set speed autonego

ethtool -s eth0 autonego on

mii-tool eth0

Thursday, 24 March 2011

To troubleshoot enabling swap space in Linux

In linux sometimes we face the issue of enabling swap space

The most easy way to troubleshoot is to rewrite the contents of etc/hosts in single user mode

For example: The contents of etc/hosts file is somewhat like this.


vim /etc/hosts

#please do not remove the following thing or required line
#that required network functionality will fail

127.0.0.1      localhost.localdomain   localhost

:wq

The simple way to trobleshoot is just rewrite the whole contents including the commented line as it is and the problem of enabling swap space would be solved.

Note: *There should not be any mistake while rewriting otherwise it would not work. If you forgot the contents see the etc/hosts file of other linux system. The default contents of file remains same in all linux with similar versions.

For Example: If you are performing in Redhat linux system then see /etc/hosts file of other system of redhat linux.

Monday, 21 March 2011

System connected to network & pinging with the gateway & other systems in the network but unable to access nothing


                           Fig: Location of  lsass file in Windows
This type of network problem is most often caused by a virus called lsass. The original file is present in window\system 32\folder. In normal circumstances only one service of lsass should be executed i.e; default of windows. But moment when more than one service of lsass starts executing it would result in anetwork problem. This is nothing but a virus in the system similar to lsass file in windows/ system32 folder. In this situation, system behaves normally if anyone checks the ping response but internet would not open, unable to access mail server, other shared data & network printer. To identify this see window task manager ->processes if more than one prcocesses of lsass is executing  then it is a virus. Another way, see the behaviour of icon of  two smalll computers  in startupbar resembling connectivity. If both are glowing simultaneously & constantly without any changes & problem is occuring then it means that it is affected by lsass virus. To resolve use systemrestore & update antivirus. Even third party combofix can also remove this virus but it cannot give gurantee because it deletes all files which it considers as virus which can result in loss of users useful data. To use combofix take backup of all important files & data.

Fig: Under normal circumstances only one process of lsass should be running

Monday, 14 March 2011

VLAN Trunking

What is VLAN Trunking

VLAN Trunking among cascaded switched network

To establish trunking using VTP among cascaded switched network

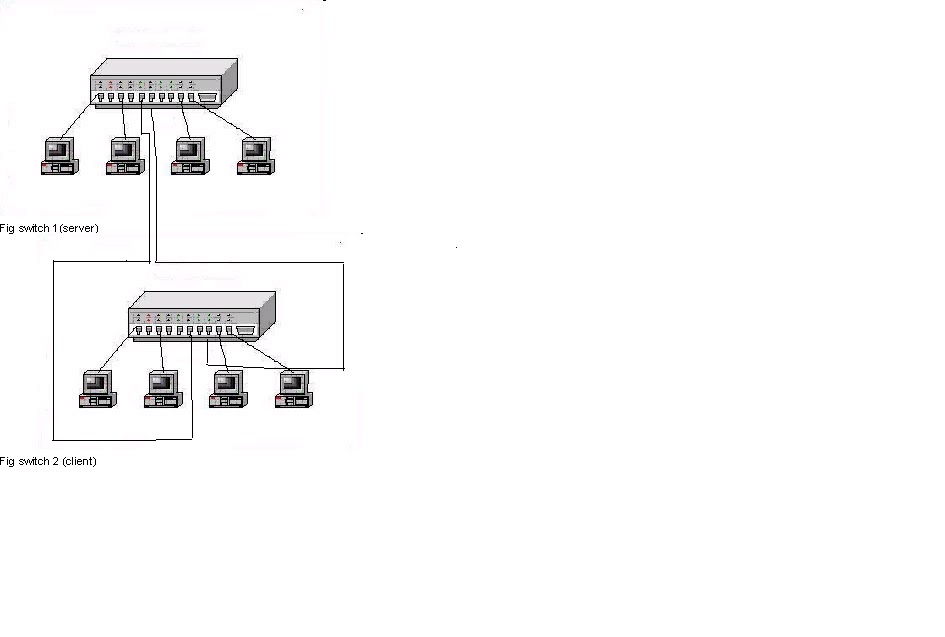
                  Fig: cascading between  two switches
Now, consider the  figure. In this figure there are two switches and  both are connected to each other. Let us assume as per the diagram interface 12 of switch 1 is connected to interface 18 of switch 2. Now, we have to establish vlan trunking so that switch 2 can access vlan information of switch 1

//To configure switch 1 as VTP server:

switch# conf t
switch(config)#vtp mode server
switch(config)#vtp domain iop
switch(config)#vtp password 123456#
switch(config)#int fa0/12
switch (config-if)#switchport mode trunk
switch(config-if)#^Z

//To configure switch 2 as VTP client:
switch#conf t
switch(config)#vtp mode client
switch(config)#vtp domain iop
switch(config)#vtp password 123456#
switch(config)#int fa0/18
switch(config-if)#switchport mode trunk
switch(config-if)#^z

//To see vtp status:
switch#sh vtp status

This command would give information about VTP domain, mode(whether sever or client mode) & many more

//To see trunk link
switch# sh vtp counter
This command would give the information that vtp trunk link is established between interface 12 of switch 1 & interface 18 of switch 2

Now, members of switch 2 can access vlan information of switch 1 and can be put on the same vlan created on switch 1. But switch 2 can't create or add vlan.
Through  this we can manage vlan centrally

Now, Consider Fig 2:

fig 2: Two switches connected with each other parallely

The fig 2 is the best scenario of cascading switched network. People think that this would result in a loop but this is managed by Spanning Tree Protocol. Spanning Tree Protocol is by default supported by cisco switches.

To explain this further let us assume that interface 11 of switch1 is connected to the interface 19 of switch 2

Server switch(Switch 1)
switch# conf t
switch(config)#int fa0/13
switch (config-if)#switchport mode trunk
switch(config-if)#^Z

Client switch(Switch 2)
switch# conf t
switch(config)#int fa0/19
switch (config-if)#switchport mode trunk
switch(config-if)#^Z

Now, As per the scenario interface 12 of switch 1is coonected to interface 18 of switch 2 & interface 13 of switch 1 is connected to switch interface 19 of switch 2. Now, in Cisco switches Spanning Tree Protocol by default blocks one port of anyone switch to avoid loop formation & if one line fails then second line automatically takes up whole thing. The algorithim which supports spanning Tree Protocol is
called Spanning Tree Algorithim

VLAN Trunking

What is VLAN Trunking?

VLAN Trunking is the method by which we can share the vlan information accross switched network. The biggest benefit of this method is that there is no need of having different management of vlans and when created centrally are more managed. One more benefit of vlan trunking is that computers across the switched network comes under same vlan if there is cascading between switches.

*Trunking does not share member information.

Requirement for Trunking:

To establish trunking between vlans either tagging method or trunking protocol is required

Tagging method:  Two types of tagging method:

1>ISL: This tagging method is used between CISCO switches.

2> IEEE 802.1Q or DOT1Q: This tagging method is used between CISCO & non - CISCO switches.

Trunking Protocol:  Two types of trunking protocol:

1> DTP(Dynamic Trunking Protocol): DTP establishes automatic trunking when two switches having same tagging method are connected together.

2>VTP(Virtual Trunking Protocol): VTP is used to configure vlan trunking manually. To configure VTP three tings are required:
VTP mode
Domain
password 

VTP mode:

Server:  This is a default mode. This mode switch can  create, delete & add the virtual Lan Information and that virtual lan information is then shared with trunk link.

Client: Client mode switch can receive the virtual Lan information from trunk link and accordingly changes its databases and then also shares with another trunk link. It cannot create or add vlan information. 

VTP Domain: It is a logical boundry in which all the switches exists. VTP domain name is case sensitive.

Password: Password is required for secure transcations of vlans.


NFS Versions & Packages Required for NFS (LINUX/UNIX)

NFS : Network File System (NFS) protocol allow Linux client to mount remote file systems and interact with those file systems as they are m...

Recently Viewed